How to estimate a house extension from plans: a worked example
By Ashton Dobbin & Baylin Spencer, EstiMate · Updated 16 November 2026
To estimate an extension from plans, check the area schedule against your own measurement, measure each trade from the drawings, mark every quantity the drawings do not prove, price materials and labour separately, then add overhead, profit, contingency and GST as separate steps. This article does that on a real two-sheet drawing set, with the numbers.
The job
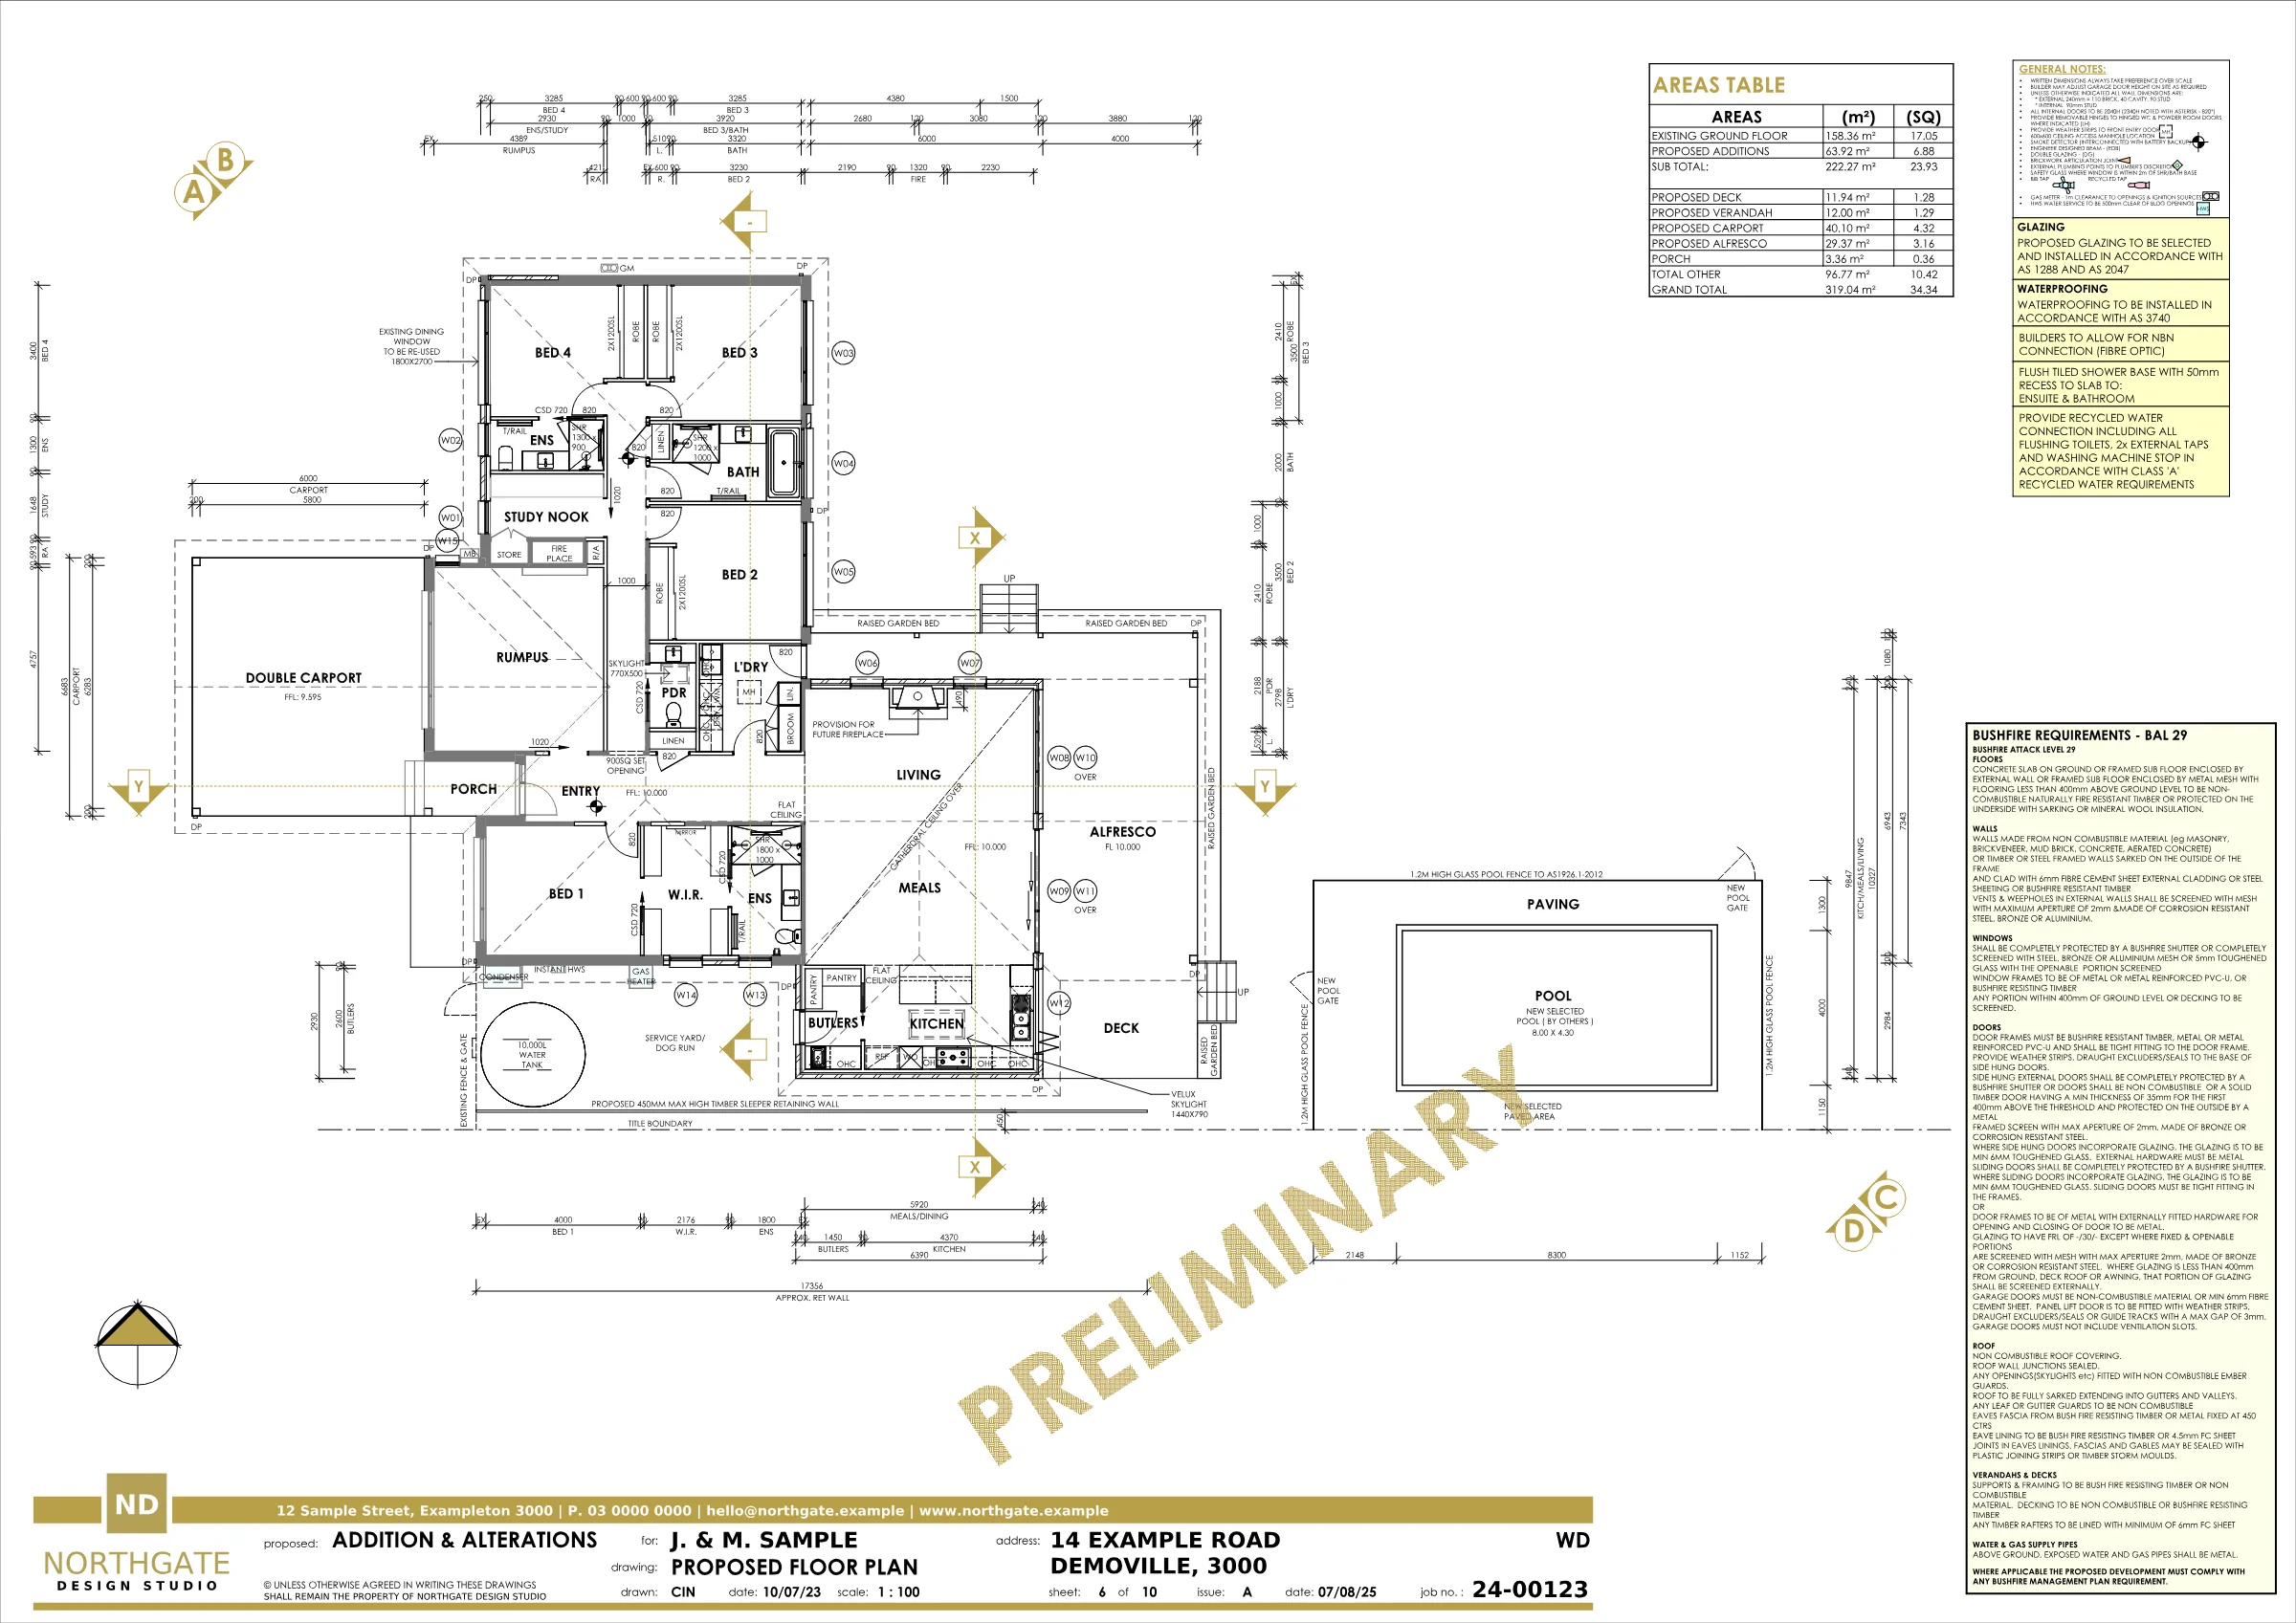
The drawing set is the Demo House from our interactive tour: an addition and alterations to an existing single-storey house. It has two sheets, a proposed floor plan and a footing plan. The documented works are the additions and internal alterations, a double carport, a deck, a verandah, an alfresco, a porch, retaining walls, some paving, a 10,000 L rainwater tank and pool fencing. The site is nominated BAL 29, and the pool itself is marked “by others”.
Two sheets is a thin set. There is no window schedule, no soil report and no finishes schedule. That is deliberate: most of the skill in estimating is knowing what the drawings do not tell you, and this job shows it clearly.
Step 1: Start with the area schedule
Before measuring anything, write down the areas the designer has already printed on the plan. They are your sanity check for everything that follows.
| Area | Scheduled |
|---|---|
| Existing ground floor | 158.36 m² |
| Proposed additions | 63.92 m² |
| Enclosed area after additions | 222.27 m² |
| Proposed double carport | 40.10 m² |
| Proposed alfresco | 29.37 m² |
| Proposed verandah | 12.00 m² |
| Proposed deck | 11.94 m² |
| Porch | 3.36 m² |
| Grand total | 319.04 m² |
Check the schedule adds up. Here 158.36 + 63.92 is 222.28, against a printed 222.27: a one-hundredth rounding difference, which is fine. A larger gap means the schedule was not updated after a design change.
Step 2: Check the schedule against your own measurement
A schedule tells you what the designer intended. Tracing the plan tells you what is drawn. On this job the two disagree in one place that matters.
| Measurement | Scheduled | Traced | Verdict |
|---|---|---|---|
| Whole enclosed floor plate | 222.27 m² | 220.80 m² | Agrees within 1.47 m² |
| Deck | 11.94 m² | 12.60 m² | Close; use the schedule |
| Carport | 40.10 m² | 47.10 m² | Conflict |
| New enclosed work | 63.92 m² | 107.00 m² | Conflict |
The whole floor plate agrees, so the tracing is sound. The new-work area does not: the schedule says 63.92 m² of additions, and the region drawn as new work traces to 107.00 m². The tracing explains most of the gap. Of the 158.36 m² existing floor, only 111.50 m² traces as retained and unaltered, which leaves about 46.9 m² of existing house being altered. Add that to the 63.92 m² of additions and you get about 110.8 m², close to the 107.00 m² traced. The schedule counts the altered rooms as existing floor; a builder has to price them as work.
This one question drives the slab, the framing, the roof, the linings, the floor finishes and the services. In the tour estimate, $66,036 of direct cost depends on it. Do not average the two figures. Pick one, write down which and why, and ask the designer.
One figure never to use as a floor area is the overall extents. This plan is 16.040 m by 20.662 m, a rectangle of 331.40 m², and the house fills nowhere near all of it. Overall dimensions are only a check that nothing has been measured outside the building.
Step 3: Measure each trade, and show the working
Work through the job in build order. For every quantity, keep the working beside the number so someone else can check it. These are taken from the tour job.
Substructure
- New slab on ground: 107.00 m² of new enclosed work plus the 3.36 m² porch = 110.36 m².
- Under-slab fill: 110.36 m² × an assumed 0.15 m depth = 16.55 m³.
- Footing trench excavation: 75.9 m of perimeter × 0.6 m wide × 0.3 m deep = 13.66 m³. The width and depth are assumed until the engineer’s schedule confirms them.
- Footing symbols on sheet 2, counted: 33 type E, 56 type I, 9 type M and 2 type P.
Framing
- New internal partitions: 27.54 lineal metres. At an assumed 2.7 m wall height that is 74.36 m² on one face.
- Plates: 27.54 m × two plates = 55.08 lineal metres.
- Studs: 63 studs × 2.61 m clear length = 164.43 lineal metres.
- Noggins: one row along the wall = 27.54 lineal metres.
Linings and wet areas
- Plasterboard ceiling: 107.00 m² less one 770 × 500 mm skylight opening = 106.62 m².
- Wall tiling: 57.20 m² net, with the bathroom and ensuites tiled full height and the powder room to 1.2 m.
- Tiles to order: 57.20 m² × 1.05 for 5% waste = 60.06 m².
- Waterproofing: 31.33 m² across the wet-area floors, shower walls and upturns.
Counts and runs
- Downpipes: 10, counted from the DP symbols.
- Windows: 15, counted from marks W01 to W15.
- Timber sleeper retaining wall: 17.35 m plus about 17.45 m = 34.8 lineal metres.
- Fitted joinery: 25.57 lineal metres across 18 runs.
Note the difference between the net quantity and the order quantity in the tiling. The net figure is what is on the wall; the order figure includes waste. Keep both, and say which one a rate applies to.
Step 4: Mark what the drawings do not prove
This is the step most often skipped, and the one that costs money. When the drawings do not give you a quantity, record it as to be confirmed (TBC). Do not fill the gap with a guess that looks like a measurement.
| Item | Why it is TBC |
|---|---|
| Glazing area | Fifteen window marks are shown, with no dimensioned window schedule. |
| External doors | No door schedule, and the plan count could not be reconciled. |
| Bulk excavation | No site-cut depth or soil information supplied. |
| Slab mesh and trench mesh | SL92 is specified on sheet 2, with no reinforcement schedule to measure from. |
| Piers and pad footings | A pier note exists, with no reconciled layout or complete footing schedule. |
| Brickwork and cladding | Material notes are present; the extent of new external wall is not established. |
| Driveway and paving | Shown without usable dimensions. |
Some of these still need a number in the estimate, or the total would be badly short. Where the tour estimate carries one, it is labelled as an allowance: the windows are priced at a provisional 22.5 m² in total, and six carport pad footings and ten trenched piers are carried pending the footing schedule. Of the 173 lines in that estimate, 4 are confirmed, 118 are provisional and 51 are TBC. That is an honest picture of a two-sheet set. Add the window schedule, the engineering and a soil report, and most of those firm up.
Step 5: Price it, materials and labour apart
Apply a rate to each measured quantity, and keep materials and labour on separate lines. A single lump per trade hides which half moved when a price changes.
| Line | Quantity | Rate | Amount (ex GST) |
|---|---|---|---|
| Timber wall-framing materials | 184.72 m² | $97.00 | $17,917.84 |
| Timber wall-framing installation | 184.72 m² | $78.00 | $14,408.16 |
The 184.72 m² is 110.36 m² of new external framing plus the 74.36 m² of internal partitions from step 3. The rates here are from the EstiMate pricing database, as the tour uses them. On your own jobs, use your supplier prices and your own labour rates wherever you have them: in the tour, the builder changes the framing labour rate to $48 per m² and the total follows.
Added up, the direct cost of the tour job is:
| Direct cost | Amount (ex GST) |
|---|---|
| Materials | $377,437.89 |
| Labour | $177,054.65 |
| Preliminaries | $25,096.80 |
| Direct build cost | $579,589.34 |
That figure covers far more than the new rooms. It includes the kitchen and butler’s pantry joinery, the bathroom and two ensuites, ducted heating and cooling, the retaining wall, pool fencing, the carport and the alfresco. It is also a first draft, before any of the open questions below are answered.
Step 6: Review the open questions before you quote
List every item that could move the price, with the dollars that hang on it. The tour estimate raises six.
| Open question | Cost that depends on it (ex GST) |
|---|---|
| Scheduled additions (63.92 m²) conflict with the traced new work (107.00 m²) | $66,036 |
| External works priced on provisional extents: paving, pool fencing, gates, garden beds | $39,794 |
| Window and external door sizes are not scheduled | $37,790 |
| Soil classification and founding conditions are not documented | $33,651 |
| Footing and pier schedule needs confirming | $14,131 |
| The takeoff read the carport as a garage; the garage door and ceiling were removed | $5,815 |
Together that is about $197,000, or roughly a third of the direct cost, resting on questions the two sheets cannot answer. That is the conversation to have with the client and the designer before a price goes out, not after the slab is poured.
Then write down what is not in the price at all. The tour estimate excludes, among other things:
- Council permits, application fees and authority charges.
- Design, engineering, survey and geotechnical reports.
- The swimming pool, which the plan marks as by others.
- Kitchen and laundry appliances.
- Asbestos or hazardous-material removal, contaminated spoil and rock excavation.
- Refurbishment of the parts of the existing house that are not being altered.
Step 7: Add margin and GST as separate steps
The direct cost is what the job costs you to build. Overhead, profit and contingency are your decisions, so the tour estimate leaves them at zero until you enter them. Apply each percentage to the direct cost and add them. Do not compound one on top of another.
As an illustration only, with 10% overhead, 10% profit and 5% contingency. These are example percentages, not a recommendation:
| Step | Working | Amount |
|---|---|---|
| Direct build cost | $579,589.34 | |
| Overhead | 10% of direct cost | $57,958.93 |
| Profit | 10% of direct cost | $57,958.93 |
| Contingency | 5% of direct cost | $28,979.47 |
| Total ex GST | Sum of the above | $724,486.67 |
| GST | 10% of the total ex GST | $72,448.67 |
| Total inc GST | $796,935.34 |
Finally, check the result against jobs you have built. Divide the total by the floor area you priced and compare. If it looks wrong, go back to the quantities in step 3, not to the margin.
The method in short
- Write down the printed area schedule and check it adds up.
- Trace the plan yourself and compare. Resolve conflicts; never average them.
- Measure trade by trade in build order, with the working beside each number.
- Keep net quantities and order quantities separate.
- Mark what the drawings do not prove as TBC, and label any allowance as an allowance.
- Price materials and labour on separate lines, on your own rates where you have them.
- List the open questions with the dollars that depend on each, and the exclusions.
- Add overhead, profit and contingency to the direct cost, then GST on the total.
To turn the result into a client document, see how an estimate becomes a quote.
Run this job yourself
The interactive tour plays this same drawing set through EstiMate, step by step, with no sign-up. Or try it free for 7 days on one of your own jobs: a card is needed to start and nothing is charged during the trial. It then carries on from $250 a month + GST, and you can cancel anytime.